> ## Documentation Index
> Fetch the complete documentation index at: https://gcore-doc-1046.mintlify.site/llms.txt
> Use this file to discover all available pages before exploring further.
# Install kubectl and connect to a Kubernetes cluster
Kubectl is a command-line tool that allows you to control Kubernetes clusters. With kubectl, you can create and configure resources, manage pods, and perform other operations.
The utility runs as follows: you enter a command, kubeclt accesses the cluster and sends an API request to it. The cluster executes the command and makes changes.
For the latest list of kubectl operations, refer to the [kubectl official documentation](https://kubernetes.io/docs/reference/generated/kubectl/kubectl-commands).
Alternatively, there is a tool with a graphical user interface called "Lens". It lets you manage the cluster not from the command line, but from the application window. You can download it on [k8slens.dev](https://k8slens.dev). This guide applies only to kubectl.
## Install kubectl and connect from Windows
1\. Send a CURL request. For version v1.23.0, use the following request:
```sh theme={null}
curl -LO https://storage.googleapis.com/kubernetes-release/release/v1.23.0/bin/windows/amd64/kubectl.exe
```
Instead of a CURL request, you can use a link to download the installation file. Find the link and CURL request for the latest Kubernetes version in the [Kubernetes official documentation](https://kubernetes.io/docs/tasks/tools/install-kubectl-windows/#install-kubectl-binary-with-curl-on-windows).
2\. Add the directory containing the **kubectl.exe** file to the **PATH** variable (so the system can access this file when executing kubectl commands). To do this, first copy the path from the command line (this is the directory where kubectl.exe has been downloaded):
 After you copy the path, navigate to **Windows settings** > **System** > **About** > **Advanced system settings**. Alternatively, right-click **This PC**, then navigate to **Properties** > **Advanced system settings**.
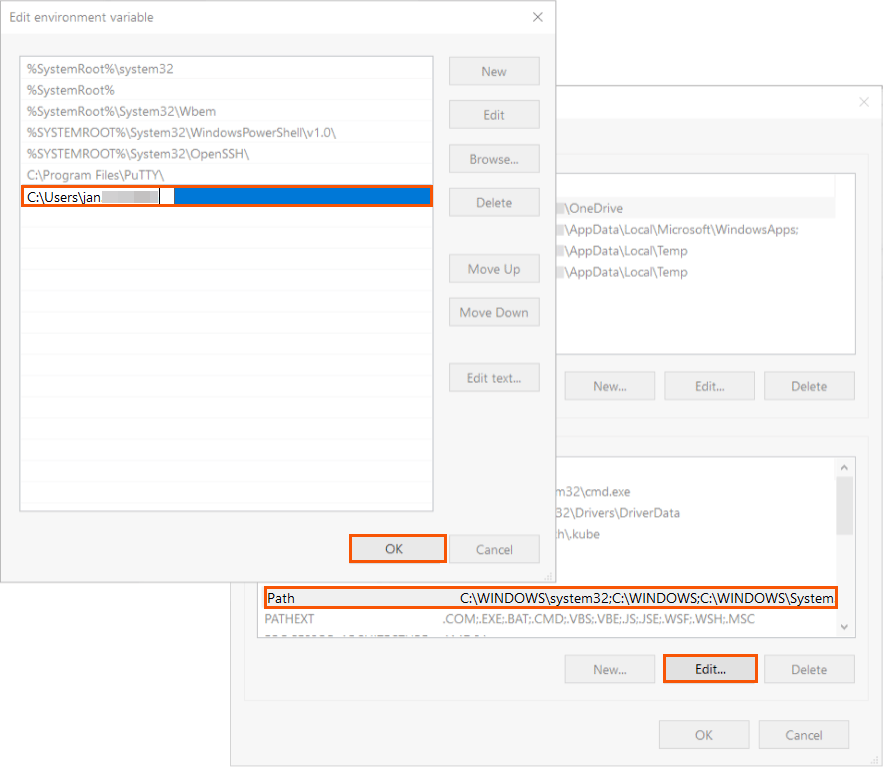
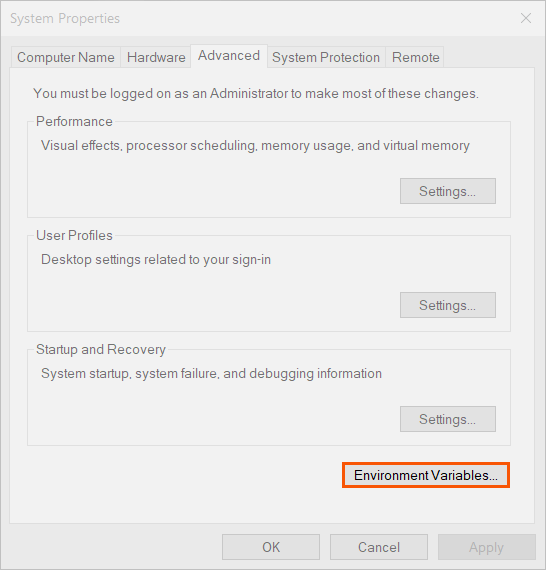 In the next dialog, select **Environment Variables** and double-click the **Path** system variable. Paste the path to **kubectl.exe** in the bottom most empty field, and save the changes.
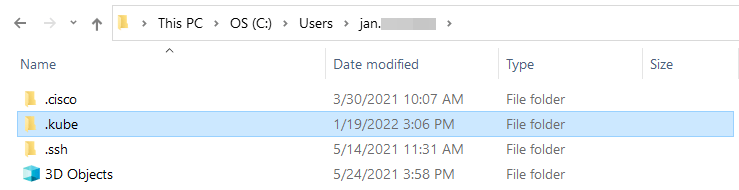
 3\. In **C:\Users\\\[username]**, create the **.kube** directory (to store the cluster configuration file).
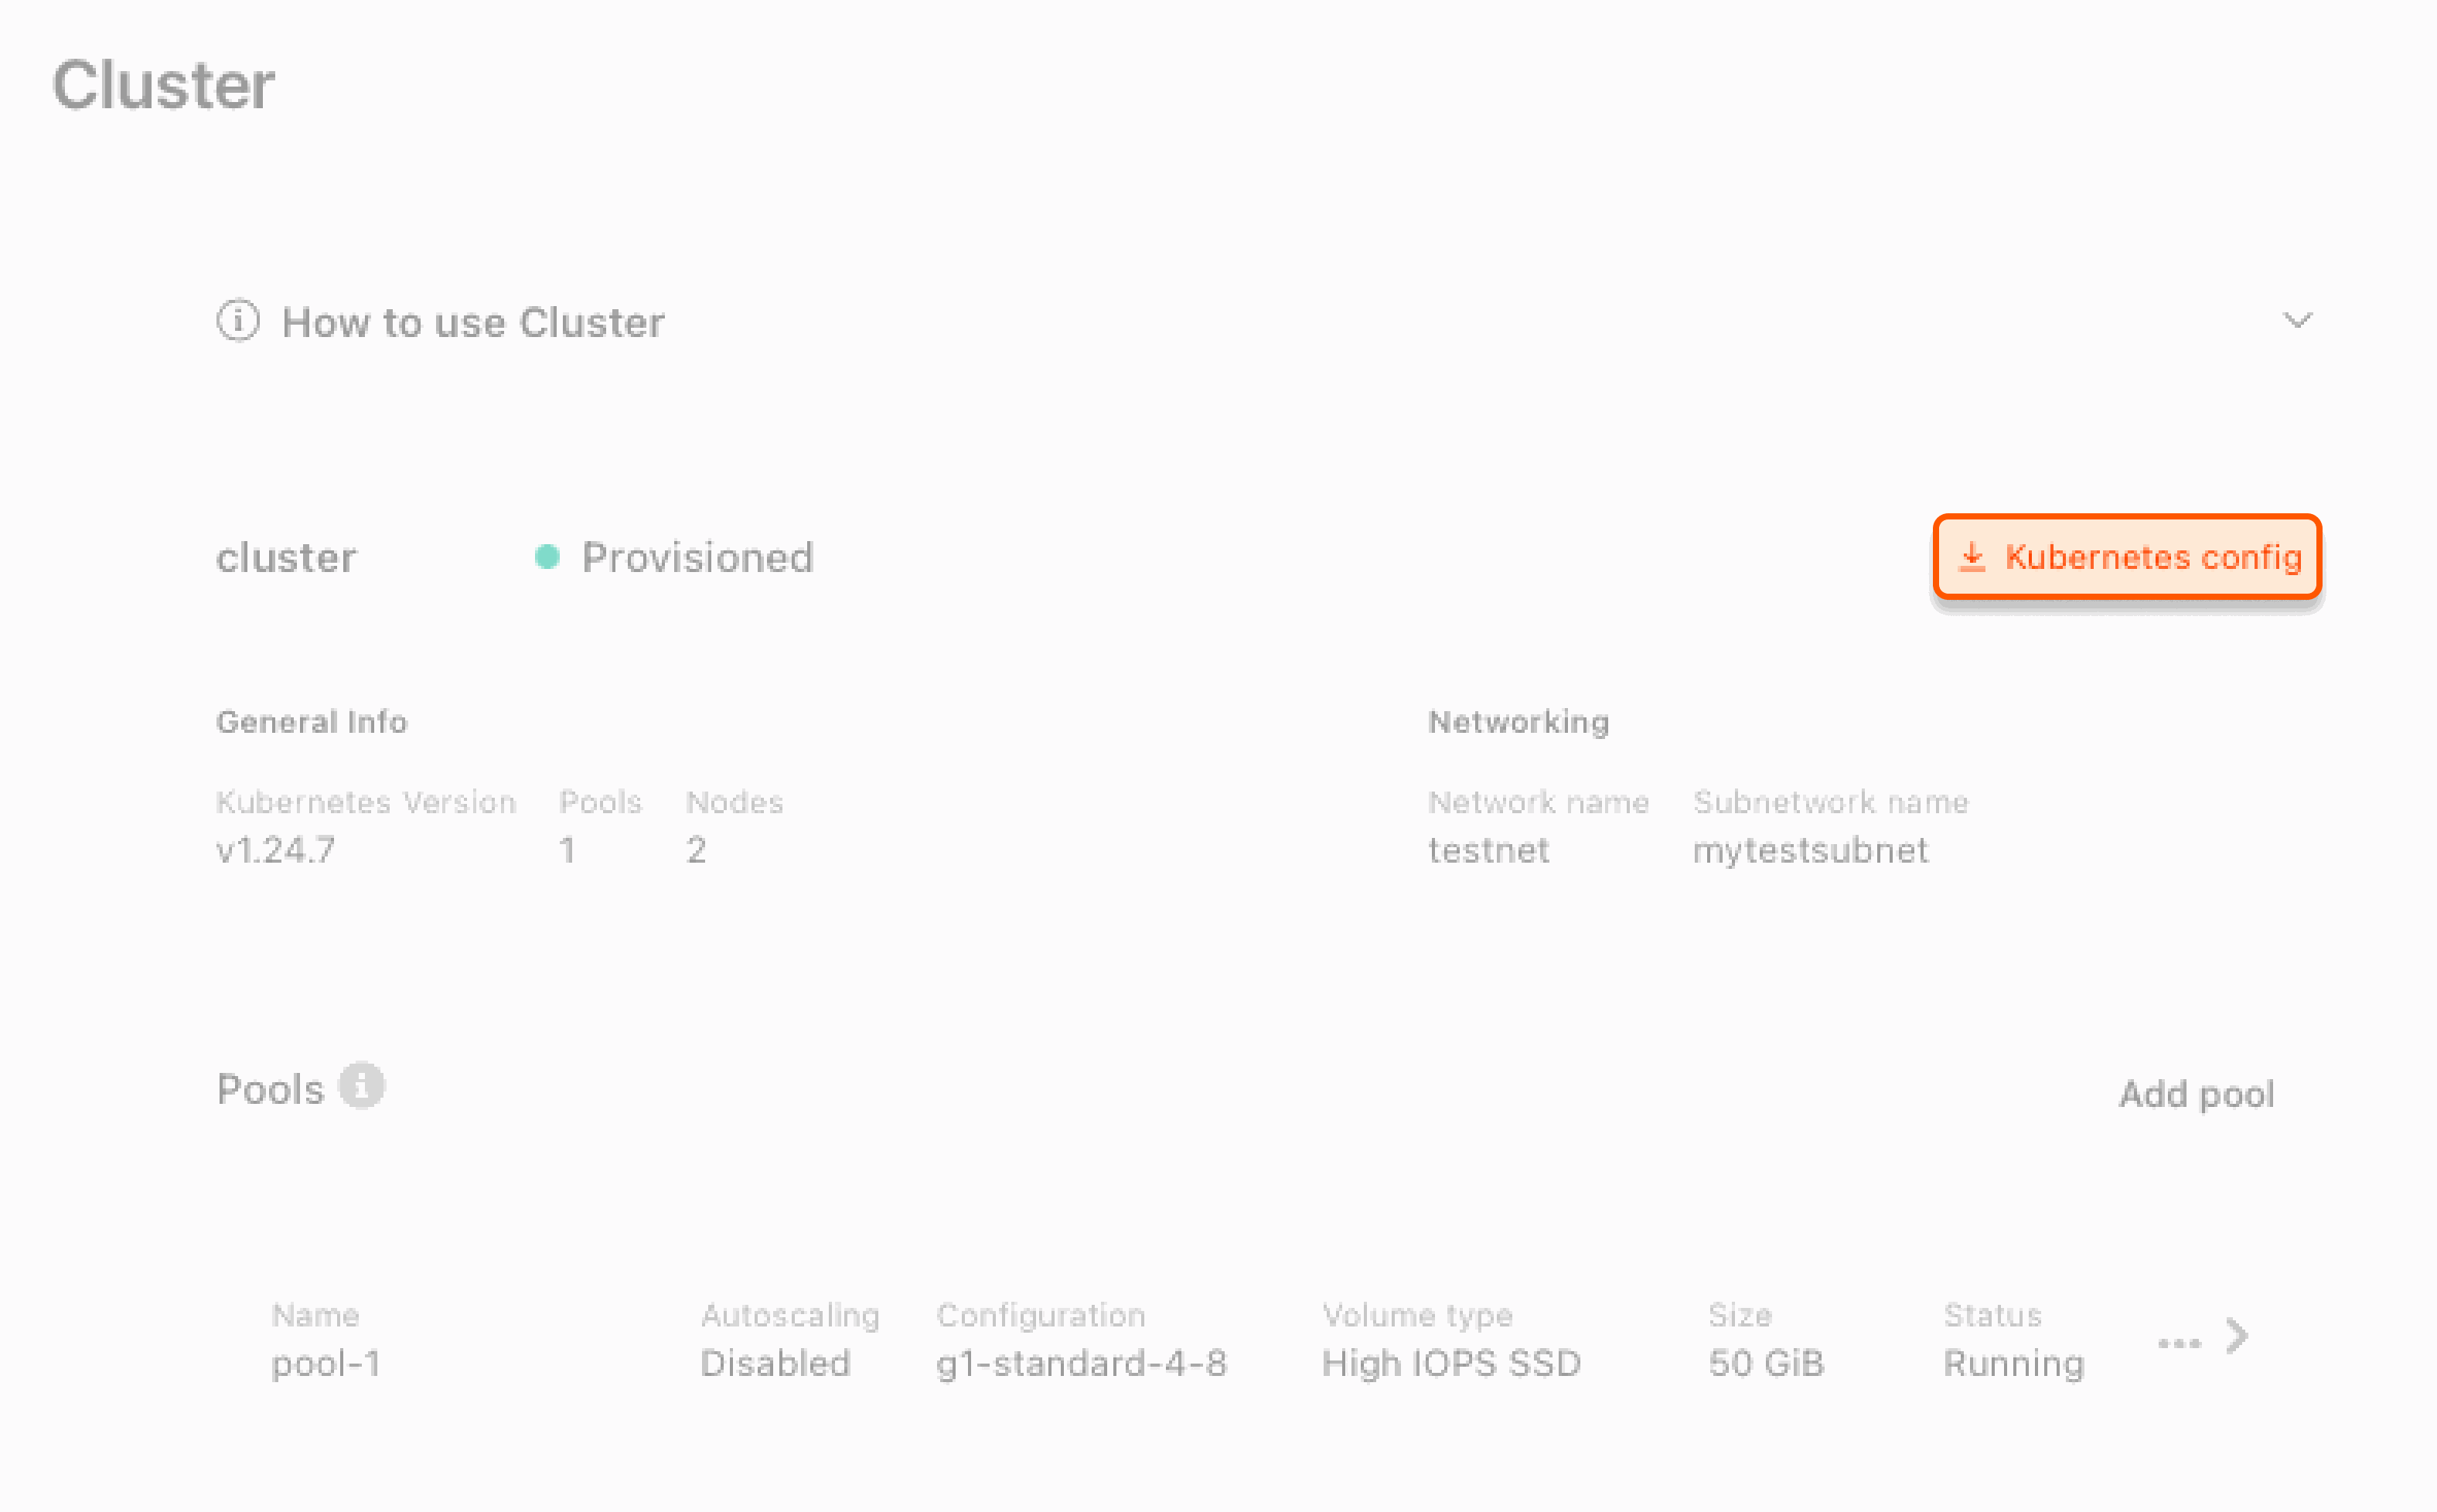
 4\. Download the configuration file.
 5\. Rename the configuration file to "**config"** (without an extension) and add it to the **.kube** folder. Kubectl can now access it and manage your cluster.
 6\. Verify the kubectl configuration. Type the command in the command line:
```sh theme={null}
kubectl get pod
```
The system is supposed to output either "No resources found in default namespace" (when there are no pods in the cluster), or data of the pods. Either result mean that kubectl is correctly configured and you can access your cluster.
## Install kubectl and connect from Ubuntu or Linux
1\. Download the latest version of the kubectl binary file with the CURL request.
```sh theme={null}
curl -LO https://storage.googleapis.com/kubernetes-release/release/\\`curl -s https://storage.googleapis.com/kubernetes-release/release/stable.txt\\`/bin/linux/amd64/kubectl
```
2\. Make the kubectl binary file executable.
```sh theme={null}
chmod +x ./kubectl
```
3\. Move the binary file into the directory from the **PATH** variable.
```sh theme={null}
sudo mv ./kubectl /usr/local/bin/kubectl
```
4\. Create the "**.kube** " directory in your home directory:
```sh theme={null}
mkdir ~/.kube
```
5\. Download the configuration file.
6\. Rename the configuration file to "**config** " (without an extension) and add it to the **.kube** folder. Kubectl can now access it and manage your cluster.
6\. Verify the kubectl configuration. Type the command in the command line:
```sh theme={null}
kubectl get pod
```
The system is supposed to output either "No resources found in default namespace" (when there are no pods in the cluster), or data of the pods. Either result mean that kubectl is correctly configured and you can access your cluster.
## Install kubectl and connect from Ubuntu or Linux
1\. Download the latest version of the kubectl binary file with the CURL request.
```sh theme={null}
curl -LO https://storage.googleapis.com/kubernetes-release/release/\\`curl -s https://storage.googleapis.com/kubernetes-release/release/stable.txt\\`/bin/linux/amd64/kubectl
```
2\. Make the kubectl binary file executable.
```sh theme={null}
chmod +x ./kubectl
```
3\. Move the binary file into the directory from the **PATH** variable.
```sh theme={null}
sudo mv ./kubectl /usr/local/bin/kubectl
```
4\. Create the "**.kube** " directory in your home directory:
```sh theme={null}
mkdir ~/.kube
```
5\. Download the configuration file.
6\. Rename the configuration file to "**config** " (without an extension) and add it to the **.kube** folder. Kubectl can now access it and manage your cluster.
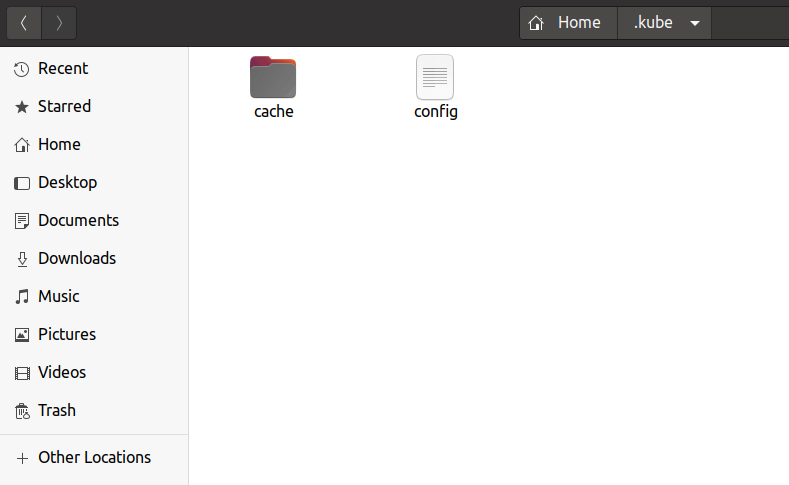 7\. Verify kubectl configuration with the command below:
```sh theme={null}
kubectl get pod
```
The system is supposed to output either "No resources found in default namespace" (when there are no pods in the cluster), or data of the pods. Either result mean that kubectl is correctly configured and you can access your cluster.
## Install kubectl and connect from macOS
1\. Download the latest version of the kubectl binary file with the CURL request.
```sh theme={null}
curl -LO "https://storage.googleapis.com/kubernetes-release/release/$(curl -s https://storage.googleapis.com/kubernetes-release/release/stable.txt)/bin/darwin/amd64/kubectl"
```
2\. Make the kubectl binary file executable:
```sh theme={null}
chmod +x ./kubectl
```
3\. Move the kubectl binary file into the directory from the **PATH** variable. To do this, first check which directories correspond to the variable:
```sh theme={null}
echo $PATH
```
The system returns a list of directories. Select one of them and move the kubectl file there using the command below:
```sh theme={null}
sudo mv ./kubectl \\[one of the directories that has been returned by the "echo $PATH" command\\]
```
For example, for the directory "/usr/local/bin/kubectl" the command looks like this:
```sh theme={null}
sudo mv ./kubectl /usr/local/bin/kubectl
```
4\. Create the ".**kube** " directory in your home directory:
```sh theme={null}
mkdir ~/.kube
```
5\. Download the configuration file.
6\. Rename the configuration file to "**config** " (file should not have an extension) and add it to the **.kube** folder. Kubectl can now access it and manage your cluster.
7\. Verify kubectl configuration with the command below:
```sh theme={null}
kubectl get pod
```
The system is supposed to output either "No resources found in default namespace" (when there are no pods in the cluster), or data of the pods. Either result mean that kubectl is correctly configured and you can access your cluster.
## Renewal of kubectl certificates
We renew kubectl access certificates every two years. To ensure you don't lose access to your Kubernetes cluster, we inform you about the upcoming renewal date:
* **In the Gcore Customer Portal**. You'll get a notification like this: *"The security certificate for Cluster will expire on 10.06.20204. Please remember to go to the Cluster page and download the new Kubernetes config on that date to ensure continued access."*
* **Via email** : two weeks before the renewal, we'll send you an email with the information about the renewal date. After the certificate is updated, you'll also get a confirmation email with a reminder to download a new certificate.
7\. Verify kubectl configuration with the command below:
```sh theme={null}
kubectl get pod
```
The system is supposed to output either "No resources found in default namespace" (when there are no pods in the cluster), or data of the pods. Either result mean that kubectl is correctly configured and you can access your cluster.
## Install kubectl and connect from macOS
1\. Download the latest version of the kubectl binary file with the CURL request.
```sh theme={null}
curl -LO "https://storage.googleapis.com/kubernetes-release/release/$(curl -s https://storage.googleapis.com/kubernetes-release/release/stable.txt)/bin/darwin/amd64/kubectl"
```
2\. Make the kubectl binary file executable:
```sh theme={null}
chmod +x ./kubectl
```
3\. Move the kubectl binary file into the directory from the **PATH** variable. To do this, first check which directories correspond to the variable:
```sh theme={null}
echo $PATH
```
The system returns a list of directories. Select one of them and move the kubectl file there using the command below:
```sh theme={null}
sudo mv ./kubectl \\[one of the directories that has been returned by the "echo $PATH" command\\]
```
For example, for the directory "/usr/local/bin/kubectl" the command looks like this:
```sh theme={null}
sudo mv ./kubectl /usr/local/bin/kubectl
```
4\. Create the ".**kube** " directory in your home directory:
```sh theme={null}
mkdir ~/.kube
```
5\. Download the configuration file.
6\. Rename the configuration file to "**config** " (file should not have an extension) and add it to the **.kube** folder. Kubectl can now access it and manage your cluster.
7\. Verify kubectl configuration with the command below:
```sh theme={null}
kubectl get pod
```
The system is supposed to output either "No resources found in default namespace" (when there are no pods in the cluster), or data of the pods. Either result mean that kubectl is correctly configured and you can access your cluster.
## Renewal of kubectl certificates
We renew kubectl access certificates every two years. To ensure you don't lose access to your Kubernetes cluster, we inform you about the upcoming renewal date:
* **In the Gcore Customer Portal**. You'll get a notification like this: *"The security certificate for Cluster will expire on 10.06.20204. Please remember to go to the Cluster page and download the new Kubernetes config on that date to ensure continued access."*
* **Via email** : two weeks before the renewal, we'll send you an email with the information about the renewal date. After the certificate is updated, you'll also get a confirmation email with a reminder to download a new certificate.